Set Up a Custom OpenAI-Compatible Endpoint
Use a custom OpenAI-compatible endpoint when your provider, gateway, or local proxy exposes an OpenAI-style API. This is the setup path for users who search for how to set up a custom OpenAI API endpoint but want the endpoint connected directly inside ExtraBrain.
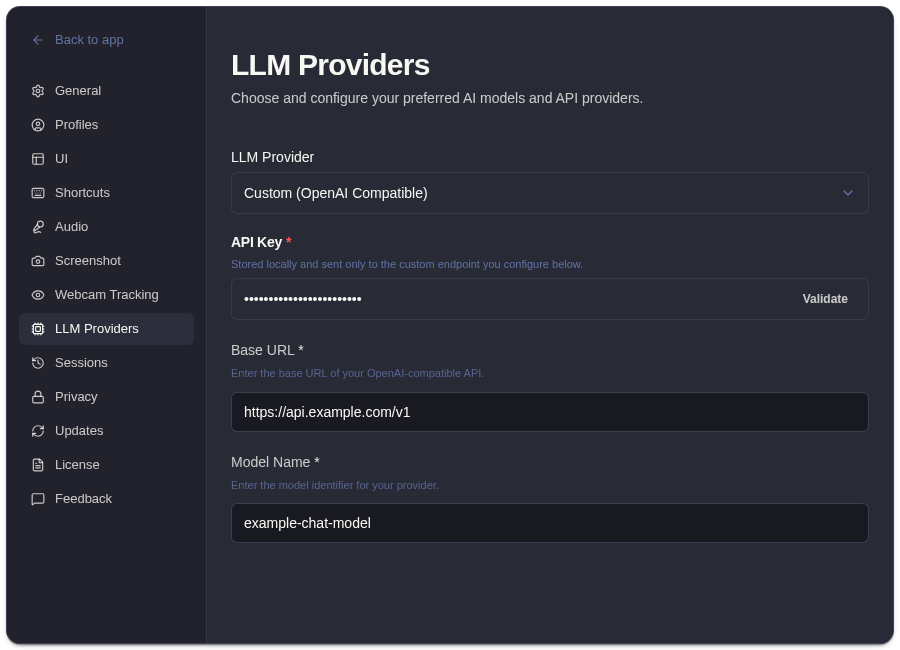
Required Fields
Section titled “Required Fields”| Field | What To Enter |
|---|---|
| Base URL | The provider or proxy API base URL, usually ending in /v1 when the endpoint follows OpenAI conventions. |
| API key | The key required by that endpoint. Use a scoped key when your provider supports it. |
| Model name | The exact model identifier the endpoint expects, not the display name shown in a dashboard. |
Setup Steps
Section titled “Setup Steps”- Open onboarding or Settings -> LLM Providers.
- Choose the custom provider option.
- Enter the custom OpenAI-compatible API base URL.
- Enter the API key for that endpoint.
- Enter the exact model name.
- Validate the configuration.
- Run a short test analysis with non-sensitive transcript or screenshot context.
Base URL Examples
Section titled “Base URL Examples”| Endpoint Type | Base URL Pattern |
|---|---|
| OpenAI-compatible hosted provider | https://provider.example.com/v1 |
| Internal gateway or proxy | https://ai-gateway.example.com/v1 |
| Local development proxy | http://localhost:PORT/v1 |
Use the base URL documented by your provider or proxy. Some endpoints expect /v1; others include the version in a longer route. If validation fails, check whether the path is missing or duplicating /v1.
Model Name Examples
Section titled “Model Name Examples”The model name must match the identifier your endpoint accepts. Examples of valid formats may look like:
gpt-4.1-miniclaude-compatible-model-namelocal-model-nameprovider/model-name
The exact value depends on your provider, gateway, or local runtime. If the dashboard shows a friendly name, look for the API identifier in the provider documentation.
Troubleshooting
Section titled “Troubleshooting”| Problem | What To Check |
|---|---|
| Validation fails immediately | Confirm the base URL is reachable and includes the expected API version path. |
| Authentication fails | Confirm the API key belongs to the same provider, project, or proxy as the base URL. |
| Model not found | Replace the display name with the exact model identifier supported by the endpoint. |
| Responses are slow | Check provider latency, local proxy performance, model size, and network routing. |
| Unexpected billing | Review the provider account directly; ExtraBrain Pro does not include external provider credits. |
| Privacy concern | Confirm what prompts, transcript context, screenshot-derived context, and custom questions your endpoint receives. |
Privacy And Billing Checklist
Section titled “Privacy And Billing Checklist”Custom provider requests can include prompts, transcript context, screenshot-derived context, and custom questions. Before using a custom endpoint for interviews, meetings, or sensitive work:
- Review the endpoint operator’s retention, logging, training, and deletion settings.
- Confirm billing, quotas, and rate limits in the provider or gateway account.
- Test with non-sensitive content first.
- Use local Gemma 4 and local Parakeet transcription where installed and compatible when the strictest local data path is required.
- Avoid sending confidential, regulated, unreleased, or third-party content unless your policy allows it.
Related Guides
Section titled “Related Guides”- Connect an AI provider
- Set up API keys
- Bring your own AI provider
- How ExtraBrain handles data
- ExtraBrain pricing and provider costs
Custom Endpoint Questions
Section titled “Custom Endpoint Questions”What makes an endpoint OpenAI-compatible?
Section titled “What makes an endpoint OpenAI-compatible?”The endpoint should accept OpenAI-style API requests for chat or responses using the base URL, key, and model name you enter in ExtraBrain.
Do I need /v1 in the base URL?
Section titled “Do I need /v1 in the base URL?”Many OpenAI-compatible endpoints expect the base URL to end in /v1, but not all providers use the same route shape. Use the exact base URL documented by your provider or proxy.
Can I use a local OpenAI-compatible endpoint?
Section titled “Can I use a local OpenAI-compatible endpoint?”Yes, if the local runtime or gateway exposes an OpenAI-compatible API that ExtraBrain can reach from your Mac and you provide the correct base URL, key if required, and model name.
What should I test after saving a custom endpoint?
Section titled “What should I test after saving a custom endpoint?”Run a short analysis with non-sensitive transcript or screenshot context. Confirm the endpoint returns a response and that the model name matches what your provider or proxy expects.